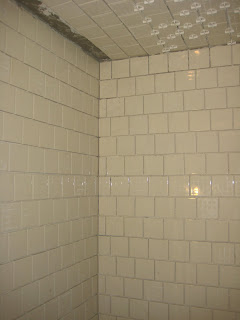
The past two weeks, Matt Childress and I have been tiling the bathroom walls and ceiling. We began with an extremely informative lesson with 'tile master' Mr. Bob Brown. He helped us prepare the walls of the bathroom. First, we used thin set mortar to strengthen the edges and joints of the cement board and WR board. We also had to be aware of waterproofing around the long, slender window in the shower. A thin, orange Kerdi Wrap serves as a vapor barrier around the window.
The pattern of the tile makes it more difficult and requires a more elaborate plan of attack. The staggering pattern of the 3" x 3" tile has an offset of one inch, so every three rows line back up. The tile wraps from the west wall, up on the ceiling and back down on the east wall. The north and south walls have an appearance of a staggered step up to the ceiling. To begin placing this pattern, we chelked lines at every three rows to use as a reference. Mr. Brown suggested that we start at eye level on a wall and work up and down. I am sure it would have not taken Mr. Brown as long to tile the bathroom, but we became more and more efficient after the first couple of sections were laid. We have almost mastered the technique of putting a layer of glue on the wall, working the tile into the glue, and spacing it against the adjacent tiles with 1/8" spacers.
I definitely have an enormous amount of respect for tilers after this experience. Their attention to detail must be incredibly on point the entire time. Even if a tile is 1/32" too low and not visible over two, the row will look slanted over twenty tiles.
We have completed all the walls and ceiling except around the window. Maintaining a flat surface and sharp corners is essential for a smooth surface of tile. Once we finish laying the tile around the window, we can clean any glue residue and begin grouting! We have practiced grouting and tested different grout colors. The decision is between a bright white to match the walls around the toilet or a light gray to match the floor and window frame.
Here is our progress right before Matt laid the last row of tile to join the south and west walls to the ceiling.
Monday, April 11, 2011
Subscribe to:
Post Comments (Atom)

Yes the all tiles information provide wonder useful to home maker. I like about the tiles design and good art color.
ReplyDeleteHm, progress seems to be going well. So far, the bathroom is looking good with those tiles. And yeah, one needs to be very thorough and precise in order for the tiles to look uniform. When they blend in together, it looks like a very wonderful floor or wall.
ReplyDeleteWe make online shopping for Mosaic Tiles easy! Get Great Bargains on a Variety of Glass TilesStylish mosaic tiles for kitchen bathroom, backsplash, patio or pool.
ReplyDelete